Computer Headset interface for Icom IC-718
I like to learn, I like to build stuff, and I like to stretch my ham dollars. These three things seem to combine very well at times in this great hobby of ours.
I was contemplating the purchase of a headset and a PTT foot switch to make my contesting life and chasing DX a bit easier. My XYL gave me the OK to buy one of those much raved headsets from that guy who drives a pink Thunderbird. But since pink isn't really my color and $250 seemed like a lot of money for some plastic and wire that holds two speakers and a microphone near your head, I decided to hold off for a while to see if I could come up with a cheaper way to reach my goal.
While strolling through the isles of a local office supply store one day, I noticed these computer headsets that contained a noise canceling microphone element. Now that sounded interesting. For about $20 I became the proud owner of a Labtec Axis-302 headset. The specs list a 20Hz-20kHz frequency range for the speakers, and 100Hz-16kHz for the microphone. At the local Radioshack I picked up a $5 foot switch, making sure I smelled the box first to ensure that it was not a returned item.
The next question was how to hook it all to the Icom IC-718 rig I have? A googlisch search on the net brought me to KK5DR's web site who had battled this issue before. I found a schematic on his web site for a microphone pre-amp that I could use for this headset. I modified it a bit to make it work for my situation and added the PTT foot switch to it.
My modified version of the schematic is drawn using TinyCad and is available in PDF format from this site. Please note that the variable resistor at the output of the amplifier should be 10k and not 2k5! The reason for this is that with the smaller variable resistor you cannot reduce the gain enough if you use the compressor on the IC-718.
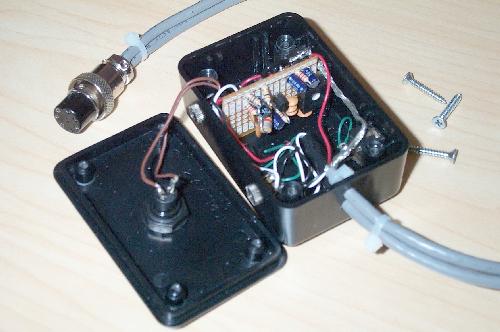
I built the pre-amp on a small piece of perf board and put it in a small plastic enclosure (available at Radioshack) with jacks for the headset connectors on one side and two 2.5mm jacks for PTT switches on the other side. One of the PTT jacks is used for the foot switch and the other is just there for future use. I added a momentary push button switch to the lid of the enclosure as an extra PTT switch, just in case I don't want to use the foot switch or in case I kicked the foot switch out of reach in the middle of a QSO.

As you can see, there are two (shielded) cables going to the 8 pin mic connector. The reason for this is that I only had 4 conductor cable in my junque box, and needed 5 conductors. Originally I didn't plan on including a PTT switch, so 4 conductor cable would have been fine. As it often happens with me, 5 minutes into building this, I changed my mind and added the switch. It would look a lot better if you'd use 5 conductor shielded cable.
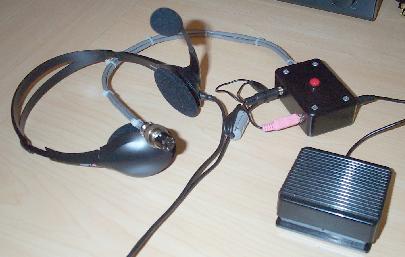
Here's the final family picture:

You may notice that I added a ferrite core (gray) to the headset cable. I usually operate at QRP levels, but run a 100 Watts on some HF phone nets. At 100 Watts I noticed that I had a slight RF feedback problem on the receive audio (transmit audio is fine) which was totally cured by adding the ferrite core.
conclusion
I've used this headset and interface in several major contests, nets and chasing DX. I'm very pleased with it and I've received very good audio reports, solicited and unsolicited. One person even said that the HC element made all the difference....there is none. This setup does not produce full bodied audio with a big bottom, but a rather punchier audio with a bit of emphasis on the higher tones needed for proper articulation.
If you have any questions or suggestions, please do not hesitate to drop me an email.
73,
--Alex, KR1ST
