
Mobile 2-meter radio installation in 2003 Toyota Corolla
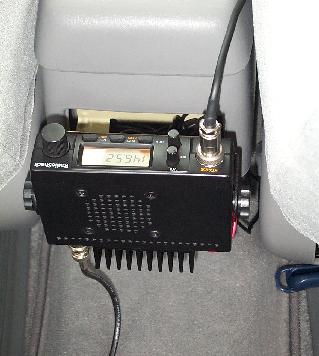
In November 2002 I ran into a cheap close out deal on a RadioShack 2 meter radio, the HTX-252. Since I didn't have a radio in the Corolla, I thought it would be a good idea to put this one in that car. The radio itself is very basic with no frills.
After purchasing the radio I had to figure out where to mount it. A natural choice would be in the dash, perhaps sacrificing either the CD and/or sunglasses storage spaces. I started by taking out the glove compartment on the passenger side and peeked behind the dash for mounting possibilities. Not surprisingly, everything is plastic these days and taking the dash apart, so you have enough space to work with, seemed to be very challenging. Since I have very limited experience in taking apart these types of dashes, I realized it would probably be better for me and the car to find a different place to mount the radio.
My main concern was to not have the radio blocking anything in the car, so I wasn't too keen on mounting it on top of the dash or in the leg space on the passenger side or even a pedestal type mount. After thinking about it for a while I realized I would never use the retractable cup holders in the back of the center console. A radio, instead of those cup holders, seemed to be a good trade for me. A nice advantage of using the center console is that power is already available in the center console through a cigarette lighter outlet. The HTX-252 draws less than 5 amps, which is much lower than these outlets are rated for.
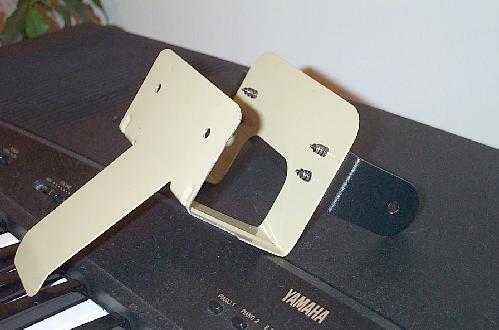
The cup holders are fastened by only two screws. Once you take these out, you can lift the whole cup holder mechanism out of the center console. Now you have a gaping hole which begs to be filled with something useful. I decided to make a bracket out of a standard metal book end that would fit inside the console. The bracket that comes with the radio would then be mounted onto the bracket made from the book end. By using the same mounting holes and screws which kept the cup holders in place, you do not have to do any drilling to mount the bracket.
The picture below shows the finished bracket.
The two holes near the top of the bracket and the two left over screws from the cup holders are being used to mount the bracket in the space of the cup holders. Drill 4 holes on the back of the bracket to mount the bracket that comes with the radio. The flat piece at the bottom of the bracket pushes slightly against the rear of the center console (on the inside where the cup holder used to be). This helps to create a nice sturdy mount and prevents the radio from vibrating while driving.
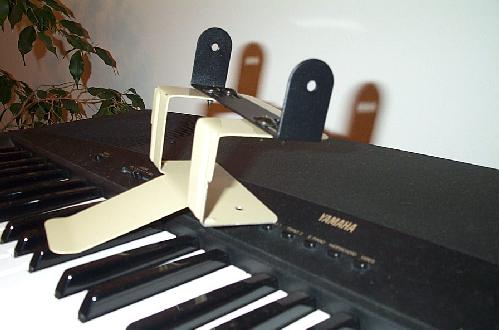
Below are two more pictures of the bracket at different angles.
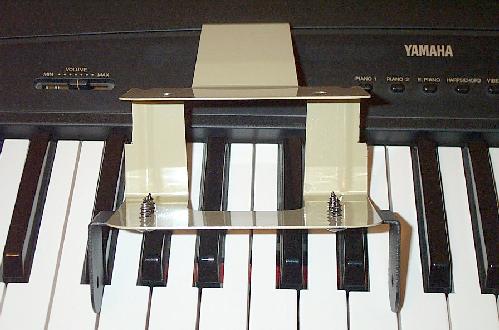
As you may notice in the picture above, I had to cut two small slots on each side of the bracket to make sure the bracket slides easily in the hole where the cup holders used to be.
I am deliberately not giving any specific measurements because sizes and shapes of book ends vary by brand. Just make sure that the part where the bracket of the radio mount on sticks out back far enough so that the radio will not interfere when you lift the arm rest of the center console. Other than that, there's nothing critical about it.
It is probably easier to mount the bracket first before putting the bracket on it that comes with the radio. But before you mount the bracket you have to drill a hole from the compartment where the cup holders used to be to the inside of the center console. This hole is needed to lead the power cable through. Make sure you don't drill the hole where it would be covered by the bracket.

You can either install the power cable before or after installing the bracket. It doesn't really matter. However, if you suspect that it may be rather hard to reach the hole after installing the bracket first, then install the power cable first. As you can see, I prefer to use a cigarette lighter plug with binding posts. These are of much higher quality than the regular (cheaper) plugs and they allow you to connect something else to it if needed. I soldered spade plugs on the power cable that came with the radio and fastened these on the binding posts. Check for polarity!
Now you can go ahead and install the bracket and radio.
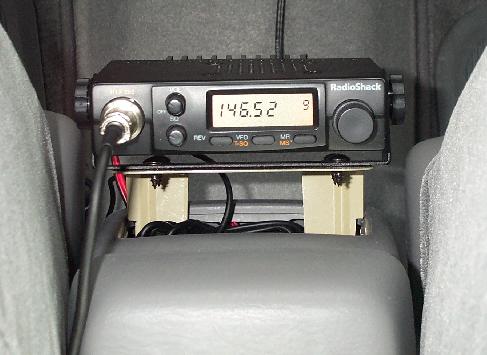
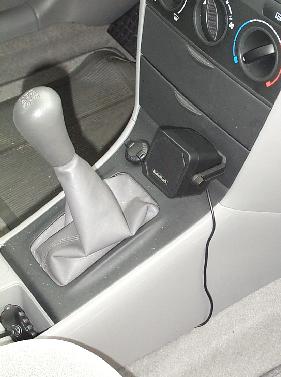
The nice thing of using the cup holder compartment is that the excessive cable can be simply rolled up and put in this compartment out of sight. No need to cut the power cord or having it taking up space inside the center console.
Below is a view from the back seat.
As you can see there plenty of space between the radio and the center console so that the arm rest will not bump the radio when it's lifted up.
The antenna cable is routed over the hump to the back seat and then routed underneath and around the back seat into the trunk space. More on the antenna installation in a moment.
I also installed a small RadioShack communications speaker in the front on the lid of the sunglasses storage space.
This speaker makes plenty of noise while driving at highway speeds. The speaker of the radio itself is firing in the direction of the back seat, which makes an external speaker almost a necessity.
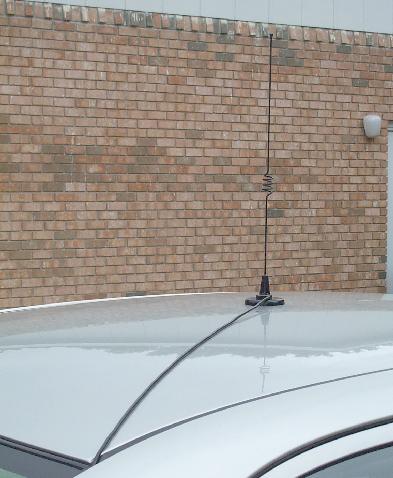
The antenna I use is a 19 inch dual band whip on a magnetic mount. The coax is routed to rear window on the passenger side. There it goes in between the car body and the window molding.
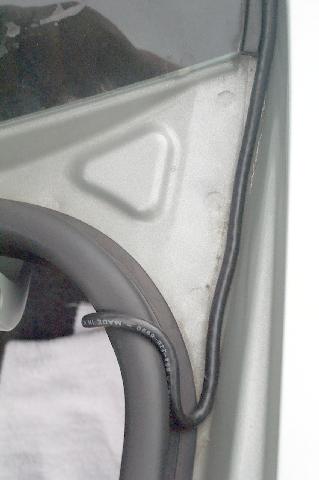
The window molding will hold the RG58 cable snug. I do not use tape, RTV or any other means to keep the cable in place.
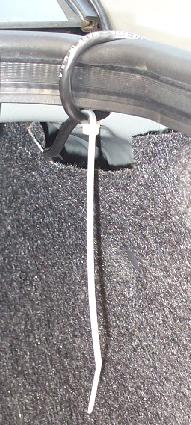
Where the cable reaches the trunk opening, I first made a small drip loop before leading the coax over the rubber seal. That will help tremendously to prevent water from entering the trunk.
Again, nothing is used to keep the cable in place. The cable has never moved out of its position nor has water ever entered the trunk.
Only one tie wrap is used to attach the coax to the car body inside the trunk. This was more to lead the cable behind the trunk padding rather than to keep the coax in place.
A second small tie wrap was put on the coax to prevent water that makes it into the trunk along the coax from going any further down the coax into the car. It acts the same way as a drip loop would. You can always roll up a towel and place that underneath the entry point to absorb the water. This setup has seen some torrential rain, and I never have noticed a drop of water in the trunk.
If you have any questions or suggestions, please do not hesitate to drop me an email.
73,
--Alex, KR1ST