
cook up your own Emergency power pack
When you buy one of these commercial power packs - you know, the kind you can use to jumpstart your car in case your car battery is flat - do you really know in what condition the battery is? Unless you tested it, you probably don't. I certainly didn't. I purchased one I thought was fresh and kept it charged religiously. Or so I thought. When it was time to actually use it during a brief power outage to power a radio, the power pack proved to be powerless.
The battery measured a nice 12.7 Volts with no load attached to it, but as soon as I put a very small load of a hundred milliamps on it, the voltage dropped to less than 6 Volts. Ouch! When the power came back after 45 minutes or so, I put it on the charger that came with it. It immediately indicated that the battery was charged, while it obviously wasn't. I got my small brute force charger out and tried to charge the battery at 17 Volts. The current meter on the charger wasn't indicating anything, so I measured the charging current with a multimeter and found that only a measly 20 milliamps was heading towards the electrolyte-filled paperweight.
I left the charger on the lead plated gelly jar for about a week or so, constantly checking the charging current, hoping the battery could be revived. Even after a week, not more than 130 milliamps were brave enough to dive into the acidic solution. Apparently the lead plates had sulfated to a point where the battery had become unrecoverable. The battery must have been on the shelf too long before I purchased it.
So now what? Buy another one? Not after this experience! It's time for a homebrew solution. That way I know all the ingredients and the builder!
Below I'll present a recipe to make your own Emergency Power Pack. It does not contain step-by-step instructions, but it provides a basis to brew your own depending on your needs and tastes.
***A Warning and some legalese***
For this project I use a lead acid battery. These types of batteries contain a very aggressive acid that can cause severe injuries and damage if one is not careful when handling such batteries. Make sure you take all precautions when handling the battery and only use it in a well-ventilated area. Please follow the manufacturer's instructions for proper handling and maintenance of the battery.
You will notice that all pictures in this article have been taken inside. This does not mean that it is safe to use a lead acid battery inside the house nor does it constitute an endorsement to do so.
Lead acid batteries store a lot of energy and can release this energy very quickly. Shorting such a battery can cause a lot of trouble, not the least of which is posing a serious fire hazard. Be careful!
Educate yourself about (deep cycle) lead acid batteries before attempting to build this project. If you feel at all uncomfortable handling and using lead acid batteries then do not build this project. I cannot be held responsible for any damage or injury.
The ingredients
This project does not contain any hard-to-obtain parts. In fact, I found all parts, except two, in the automotive section at Walmart. The two parts I could not find at Walmart were a charge connector and binding posts. I found these both at Radioshack.
The main ingredients are the battery and the charger.
The Float Charger
The charger I found suitable for this project is a so called "trickle-charger" made by Everstart.
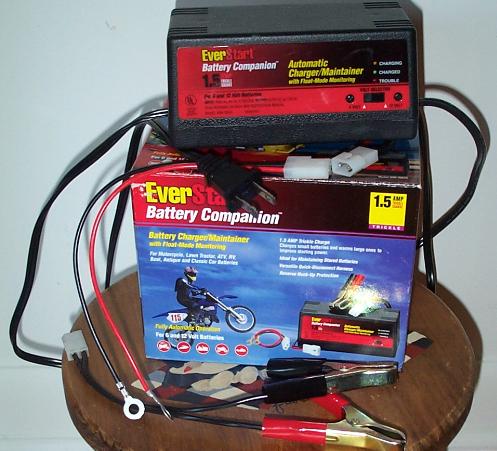
The model I use here has two charging modes. It can either charge the battery at a maximum current of about 1.5 Amps or it will float charge a battery in order to maintain its charge. In the float charging mode the charging rate is so low, in the order of just a few milliamps, that you can leave the charger on the battery indefinitely. This charger will switch automatically between the two modes.
The charger is really too slow to fully charge a discharged deep cycle battery. It may take this charger 48 hours to do so. Even though it is better to charge a battery slowly, you may want to charge the battery first with say a 6 Amp charger before putting the battery on the float charger.
If you can't find the Everstart charger shown above, try its replacement, the Vector VEC080 float charger.
The battery
I purchased the largest deep cycle battery I could find at Walmart, the Everstart Maxx-29. It's actually a so called "hybrid" battery. This means it can be used as a starting battery and as a deep cycle battery. These are not as good as true deep cycle batteries in applications where you frequently discharge the batteries, but they will do the job nicely for infrequent usage.
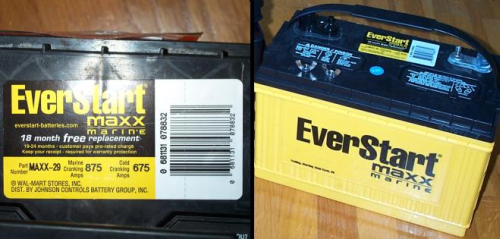
This battery has a reserve capacity of 205 minutes. This means that the battery will deliver 25 amps continuously for 205 minutes before the voltage drops below 10.5 Volts. This is a better measure of the capacity of a battery than Cranking Amps (CA) or Cold Cranking Amps (CCA).
The battery Box
When you purchase the battery, make sure you purchase a battery box of the correct size with it. Batteries are sized in Groups. The battery I use is a Group 29 size battery. So make sure that the label on the battery box indicates the same size as your battery:
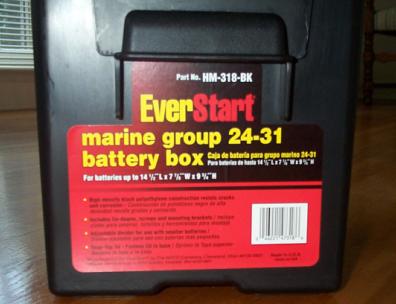
As you can see, this box will hold batteries from Group size 24 up to 31. These boxes can be bought for under $10 and they come with a strap and hardware to fasten the box to a suitable surface.
Extra Spices
Depending on how you wish to utilize your power pack, you may need extra supplies (for example, power outlets, switches, fuses, etc.). For my power pack I wanted two switched and fused (both the negative and positive side) power outlets. One was a cigarette lighter-type outlet, and one was a set of binding posts. The cigarette lighter outlet could be used for appliances that usually come with a cigarette lighter plug, and is rated for 15 Amps. The binding posts can be used for appliances that require a higher current, up to 30 Amps, like a high power (100 Watt) transceiver.
For this you need the following parts:
- cigarette
lighter power outlet (Walmart)
- two 30 Amp switches (with built in LEDs) (Walmart)
- six fuse holders (Walmart)
- one box of 15 Amp fuses (Walmart)
- one box of 30 Amp fuses (Walmart)
- roll of #16 wire (Walmart)
- roll of #12 wire (Walmart)
- ring terminals (Walmart)
- blade or spade terminals (Walmart)
- one binding post set (Radioshack)
- one 2 position molex connector (Radioshack)
- some hardware to mount the molex connector
- shrink tubing (Walmart or Radioshack)
Let's get cookin'!
Take the lid off the battery box and place the parts on the lid to see where they would be most practical for your situation. Keep in mind where the battery terminals will be. If possible, mount the connectors and switches as far away from the battery terminals as possible to prevent shorts. Once you have determined where the connectors and switches should go you can drill the appropriate holes and mount them.
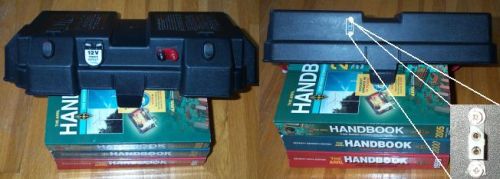
After the switches and connectors have been mounted, you can continue with the wiring. Use black wire for the negative side and red for the positive side. You'll notice in the pictures that I have also used red wire on the negative side. The reason for this is that the inline fuses at the local Walmart store only come with red wiring. If the inline fuses you use also only came in one color, then please be extra careful and check everything twice. The battery I used came with binding posts that have a wing nut. Therefore I used ring terminals for the battery connection. If your battery does not have such binding posts, then you can use regular battery terminals to make the connection to the battery.
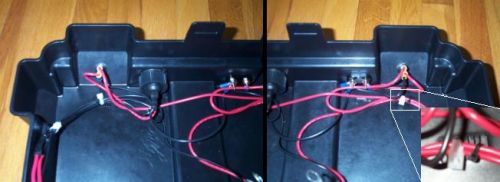
As you can see in the little insert in the picture above, I attached the wiring harness to the vent holes with a small (black) wire tie. This helps keeping the wiring in place. Use shrink tubing or good electrical tape to insulate and seal any splices you may have to make. You can solder the wiring directly to the switches, but I choose to use blade terminals which makes exchanging switches easier if they ever go bad, or if the LED in the switch goes bad.
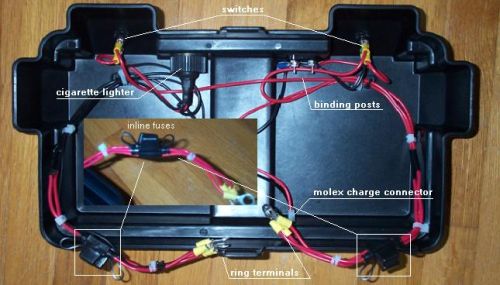
Put inline fuses on both the positive and negative sides and use a separate set of fuses going to each switch-connector combination. That way you will be able to fuse each connector at a different rating if necessary. I used 15Amp fuses for the cigarette lighter connector and 30 Amp fuses for the binding posts.
Once the wiring is completed, it is very important that you check and test the wiring before attaching the battery. Even though you have provided for sufficient fusing, a short can still result in some bad sparking and it would be a waste of fuses to find out that you made a wiring mistake. Check the wiring with an ohm meter and make sure that the switches work. When this checks out ok, then you can do an additional test using a 9V battery and a battery clip. Attach the battery clip temporarily to the ring terminals that will later be mounted on the battery, with the correct polarity. Make sure the switches are in the off position and connect the 9V battery. Now test each circuit by flipping the switch to the on position and test the voltage on the connector with a volt meter. You should be able to turn this on and off. If the switch is equipped with an LED, it should light up in the on position. Also test the charge connector to make sure that the polarity is correct and matches that of the charger.
If everything is still ok, then attach the charger to the charge connector and do the same tests as described above to make sure that the wiring is ok. Now you're ready to mate the top cover and the wiring harnesses to the battery and battery case.
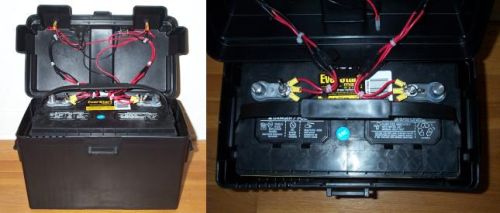
Make sure the switches are in the off position before you connect the wiring harness to the battery. Also make sure that the polarity is correct. Attach the wiring to the battery's binding posts or use the terminals. Before closing the cover make sure the wiring will fit completely inside the top cover and that it will not obstruct the proper closure of the case. To make yourself feel very smart in the future when you use the Emergency Power Pack at, say, a picnic, and blow a fuse, top off this recipe by throwing a baggy with spare fuses in the box or attach it to the top cover or battery carrying handle.
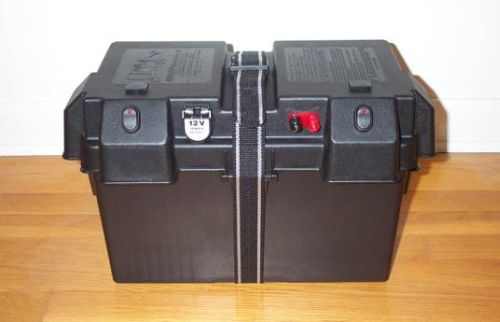
You can now close the cover and put the strap that came with the battery box over the cover to secure it. Turn on the switches and if you don't see smoke and aren't inhaling blown fuses, you can check the voltages on the connectors. Make sure that the polarity is correct before connecting anything to the battery. If you don't find any problems, turn off the switches and you're done!
You want some juice with that?
Juice is healthy. Not just for us humans, but also for batteries. Before hooking up the float charger to the battery, make sure that the Voltage Selector is set at the correct voltage, 12 Volt in this case. Now you can connect the charger to the battery using the charge connector and plug the charger into a wall outlet.
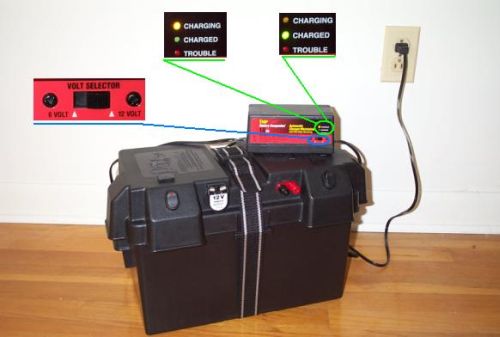
Since the battery may have discharged a bit on the shelf, the charger will probably first switch to charge mode. When the battery is charged, the charger will switch to float charging. You can leave the charger on in this state indefinitely. If the trouble LED lights up, disconnect everything immediately and check your wiring.
How about a serving?
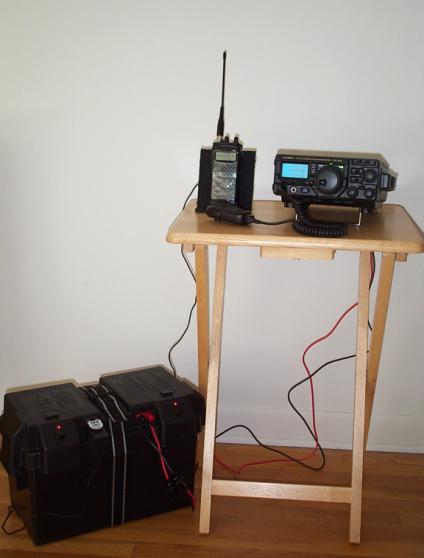
Nothing tastes better than freshly squeezed juice. Let your rigs drink from the homebrew fountain and enjoy the rewards at a Field Day event, a day in the park, or in a real emergency.
Conclusion
I hope this article will give you some ideas on how to build your own Emergency Power Pack. You can use Anderson Power Poles instead of a cigarette lighter socket and binding posts. The uses of this power pack are not limited to Amateur Radio applications, but can be used wherever portable power is needed.
I have been using this power pack for over a year now, and it is still in the same condition as when I first built it. It also has been continuously charged in the garage, and I've never had to top off the battery.
A power pack like this can also store the extra energy your generator produces during a power outage. This stored energy can then be used when the generator is turned off during the quiet hours.
If you have any questions or suggestions, please do not hesitate to drop me an email.
73,
--Alex, KR1ST